Brownies, but in cookie form. Bonus: no eggs, so even the squeamish can eat it raw!
INGREDIENTS:
A box of brownie mix
About a cup of apple sauce
A little bit of vanilla soy milk (you could use regular milk or even water, but I like this because it adds body and it's what I have on hand)
optional: extra flour
DIRECTIONS:
Preheat oven to 400.
Mix the apple sauce into the brownie mix. It will take a while before it starts looking wet. Add just enough soy milk to make a thick batter. (I added a bit too much at first, so I added some extra cake flour to thicken it back up a bit.) Chocolate chips or nuts would be tasty too.
Let it rest for a few minutes to thicken.
Dollop onto your favorite nonstick baking surface. Give 'em space because they want to spread. Bake 8-12 minutes (until no longer wet), then remove to cool. I recommend eating them as soon as possible without burning your mouth because that severely impedes enjoyment.
Make sure the pan cools completely before you put the next batch on, you don't want too much extra spreading.
(photos coming soon)
08 July 2012
22 May 2012
Nail Polish
I'm giving myself a manicure today so I figured I would take a picture of my favorite nail polishes (otherwise known as the ones in my collection that are Sephora by OPI). I have some other fun colors but I think as time goes on they'll all get replaced by OPI because it is by far the best brand I've ever used.
 Left to right:
Chestnuts About You (shimmery pink champagne)
Curve-Aceous (shiny true red aka The Woman)
Just A Little Dangerous (slightly glittery deep plum, aka Purple of Sex)
Absinthe Makes the Heart (dark green glitter)
What's A Tire Jack (black -- online sources claim it's matte but I'm not sure if mine is)
EDIT: NEW NAIL POLISHES!
 L to R:
What Aura Gonna Wear? (opaque hot pink)
How Cute Is That? (shimmery coral)
I Come In Peas (opaque kelly green)
Baker Street (opaque TARDIS blue)

Chestnuts About You (shimmery pink champagne)
Curve-Aceous (shiny true red aka The Woman)
Just A Little Dangerous (slightly glittery deep plum, aka Purple of Sex)
Absinthe Makes the Heart (dark green glitter)
What's A Tire Jack (black -- online sources claim it's matte but I'm not sure if mine is)
EDIT: NEW NAIL POLISHES!

What Aura Gonna Wear? (opaque hot pink)
How Cute Is That? (shimmery coral)
I Come In Peas (opaque kelly green)
Baker Street (opaque TARDIS blue)
12 May 2012


25 April 2012
22 April 2012
Wedding Makeup
I decided yesterday that I'm going to do my own makeup for the wedding. I think in general this will be a stress-reducer. I'm very confident with my makeup, and it's one less appointment for the day -- the only getting-ready that will be done by a pro is hair, because I'm not really great at doing my own hair. I also spent $100 at Sephora yesterday on products specifically for the wedding -- primer, waterproof mascara, and a new lipstick.
List of products
List of products
- Plain Chapstick
- Smashbox Photo Finish Light primer
- Ben Nye creme foundation in "Rice Paper"
- Mary Kay Signature concealer in yellow
- Rimmel hide-the-blemish concealer in ivory
- ELF mineral foundation in Fair
- Urban Decay eyeshadow primer potion in "Sin"
- Sephora Collection eyeshadow in "Geisha Kiss"
- Smashbox Be Legendary lipstick in "Legendary"
- Cover Girl Professional Loose Powder in translucent fair
- Tarte Lights, Camera, Splashes! waterproof mascara
- ELF natural radiance blush in unknown color (vaguely mauve) (this is a similar product -- the one I have has been discontinued)
- Maybelline Define-a-brow Gel (discontinued, suggested replacement)
- Foundation brush
- Concealer brush
- Kabuki brush (ELF)
- Round eyeshadow brush
- Detail eyeshadow brush
- Lipstick brush
- Large powder brush
- Apply chapstick
- Prime entire face, jaw, and blend to neck, except eyelids
- Wait five minutes
- With foundation brush, apply BN foundation to entire face (except eyelids) and blend to neck. Make sure to get around eyebrows. BLEND.
- With concealer brush, apply MK concealer from back of hand to undereye dark circles and any major blemishes.
- With concealer brush again, apply Rimmel concealer as outside-lip liner, paying special attention to center of upper lip (cupid's bow) and outside of lower lip. Apply anywhere else that needs brightening, like nose. Blend into foundation.
- With kabuki brush, apply ELF mineral foundation lightly to entire face and neck, blending into chest. Buff very well to eliminate powder look.
- Touch up concealer if needed.
- Apply UD eyeshadow primer to eyelids, inner corners, and almost up to the brow. DO NOT cateye -- keep it close.
- With round eyeshadow brush, apply Sephora eyeshadow lightly to entire lid. Darken slightly at outer corner and crease, blending well. DO NOT CATEYE -- keep it close.
- With detail eyeshadow brush and Sephora eyeshadow, line upper lash line and outer third of lower lash line.
- Blot chapstick, if needed.
- Line lips with lip brush and Smashbox lipstick. Overdo the Cupid's bow at first.
- Fill in lips. Allow to dry for a minute.
- Gently blot lips with tissue. Powder with CG loose powder through 1ply of tissue.
- Reapply lipstick.
- Touch up edges of lips with Rimmel concealer, if needed.
- Apply Tarte mascara, first to tops of lashes, then to bottom (the normal way). Lightly apply to lower lashes all the way across.
- With large powder brush, apply ELF blush very lightly to create cheekbone contours. Layer to darken if desired.
- Apply Maybelline brow gel.
- Be fabulous!
05 June 2011
Free Pattern: Mitts: Drive Me Gaga

DRIVE ME GAGA
These driving gloves are worked from the top down in one piece and bordered with crab stitch, then fastened with a button.
Materials:
1 ball Debbie Bliss Cathay in red (discontinued -- use a DK weight yarn in a breathable fiber, like cotton, that makes a fabric in single crochet that is firm but flexible.)
US C crochet hook
Two 5/8" buttons
yarn needle
Techniques:
Chain, slip stitch, single crochet, crab stitch.
Size: Women's medium

LEFT GLOVE:
0. Loosely chain 16. Slip stitch to join in the round, being careful not to twist.
1. Ch 1. SC around, sl st to join.
2. Repeat rnd 1.
Try it on your index finger. If it's too big or small, adjust the number of initial chains.
3. Ch 1. Sc 12, ch 8 + 1 turning ch. (TC). Turn.
4. Sc 20, ch 4 + 1 TC. Turn
5. Sc 24, sc into last stitch again. Ch 4 + 1 TC. Turn.
6. Sc 29, sc into last st again. Ch 8. Sl st to join in the round. Turn to work with RS facing.
7. Ch 1, sc around. Join with sl st.
8. Rpt rnd 7 four times more.
9. (Do not ch 1.) SC 16. Turn.
10. Sl st into 2nd st from hook. Sc 30. Turn.
11. Ch 1, SC 29. Turn.
12. Sl st into 2nd st from hook. Sc to end of row. Turn.
13. Ch 1, sc 25. Turn.
14. Rpt row 12.
15. Ch 1, sc 21. Turn.
16. Rpt row 12.
17. Ch 1, sc 17. Turn.
18. Rpt row 12, but do not turn. Ch 10 + 1 TC. Turn.
19. Sc 23. Turn.
20. Rpt row 12, but do not turn. Ch 16. Sl st into 10th ch from hook -- buttonhole formed. Sl st into next 5 sts.
21. Crab stitch around lower edge, then fasten off. Crab stitch around upper edge. Attach button as shown so that the glove fits snugly. Weave in ends.
RIGHT GLOVE
0. Loosely chain 16. Slip stitch to join in the round, being careful not to twist.
1. Ch 1. SC around, sl st to join.
2. Repeat rnd 1.
Try it on your index finger. If it's too big or small, adjust the number of initial chains.
3. Ch1, sc 12, ch 4 + 1 TC. Turn.
4. Sc 16, ch 8 + 1 TC. Turn.
5. Sc 24. Sc into last st again. Ch 4 + 1 TC. Turn.
6. Sc 29. Sc into last st again. Ch 8. Sl st to join in rnd. Turn to work with RS facing.
7. Ch 1 SC around. Sl st to join.
8. Rpt rnd 7 four more times.
9. SC 18. Turn.
10. Ch 1, sc 30. Turn.
11. Sl st into 2nd st from hook. SC to end. Turn.
12. Ch 1, sc 28. Turn.
13. Rpt row 11.
14. Ch 1, sc 24. Turn.
15. Rpt row 11.
16. Ch 1, sc 20. Turn.
17. Rpt row 11.
18. Ch 1, sc 16. Turn.
19. Rpt row 11, but do not turn. Ch 10 + 1 TC. Turn.
20. Sc 22. Turn
21. Rpt row 11, but do not turn. Ch 16. Sl st into 10th ch from hook -- buttonhole formed. Sl st into next 5 sts.
22. Finish with crab stitch and button as for left glove.
26 April 2011
Quantum marriage?
I read an article today that made me lol. If only it were real, it would be totally perfect for us...
07 January 2011
Free Pattern: Hat: Quinto
See that hat on Zachary Quinto there?

Pretty cute, isn't it? Well, I says to myself I says, I should make one! And so I did.
SIZE:
20" circumference, unstretched. Easily stretches to accommodate even freakishly huge brains. My hat doesn't quite cover the bottoms of my ears, but it can be made longer.
GAUGE:
19 stitches = 4" in stockinette stitch.
Row gauge is less important.
MATERIALS:
One set (5) DPNs, size US 6
or One 16" circ, size US 6 and one set DPNs, size US 6
or One long circ for magic loop, size US6
or Two circs, size US 6
or size needed to get gauge.
Two skeins Brooklyn Tweed SHELTER in contrasting colors. You will probably use most of the MC, and less than half of the CC.
For my sample, I used Nest (gray/brown) for the MC and Tent (green) for the CC. The contrast isn't great, but I didn't buy the yarn with this project in mind...
To match the hat in the picture, I suggest Soot (gray) for the MC and Faded Quilt (light gray/blue) for the CC.
Eight stitch markers. Preferably, the one for the beginning of the round is distinctive from the others.
INSTRUCTIONS:
With MC, cast on 96 stitches and join to work in the round, being careful not to twist. Place marker for beginning of round.
Work in stockinette stitch (knit every stitch of every round) until work measures 3.5" from cast on edge, or longer if desired.
Next round (MC): Purl.

STRIPE:
With CC, knit three rounds.
Switch to MC.
Next round: Knit
Next round: Purl
Repeat the stripe four more times, for a total of five stripes.
Crown decrease setup:
With MC, *knit 12 sts, pm*, repeat between * around. 8 markers.
Crown decreases:
1. *Knit until 2 sts before marker, k2tog, slip marker*, repeat between * around.
2. Knit.
Repeat these two rows until 8 sts remain. Cut yarn, leaving 12" tail. Draw tail through eight stitches and pull tightly to close.
Weave in ends and wear with pride!


Pretty cute, isn't it? Well, I says to myself I says, I should make one! And so I did.
SIZE:
20" circumference, unstretched. Easily stretches to accommodate even freakishly huge brains. My hat doesn't quite cover the bottoms of my ears, but it can be made longer.
GAUGE:
19 stitches = 4" in stockinette stitch.
Row gauge is less important.
MATERIALS:
One set (5) DPNs, size US 6
or One 16" circ, size US 6 and one set DPNs, size US 6
or One long circ for magic loop, size US6
or Two circs, size US 6
or size needed to get gauge.
Two skeins Brooklyn Tweed SHELTER in contrasting colors. You will probably use most of the MC, and less than half of the CC.
For my sample, I used Nest (gray/brown) for the MC and Tent (green) for the CC. The contrast isn't great, but I didn't buy the yarn with this project in mind...
To match the hat in the picture, I suggest Soot (gray) for the MC and Faded Quilt (light gray/blue) for the CC.
Eight stitch markers. Preferably, the one for the beginning of the round is distinctive from the others.
INSTRUCTIONS:
With MC, cast on 96 stitches and join to work in the round, being careful not to twist. Place marker for beginning of round.
Work in stockinette stitch (knit every stitch of every round) until work measures 3.5" from cast on edge, or longer if desired.
Next round (MC): Purl.

STRIPE:
With CC, knit three rounds.
Switch to MC.
Next round: Knit
Next round: Purl
Repeat the stripe four more times, for a total of five stripes.
Crown decrease setup:
With MC, *knit 12 sts, pm*, repeat between * around. 8 markers.
Crown decreases:
1. *Knit until 2 sts before marker, k2tog, slip marker*, repeat between * around.
2. Knit.
Repeat these two rows until 8 sts remain. Cut yarn, leaving 12" tail. Draw tail through eight stitches and pull tightly to close.
Weave in ends and wear with pride!

05 January 2011
Free Pattern: Hat: Ex Astris, Scientia
I designed this very, very simple hat for the "learn to knit" post I wrote over at ONTD: Star Trek for Academy Week 2010. It would be a great first project for a new knitter, since it is in garter stitch, but is shorter than a scarf. It is worked flat, and minimal finishing techniques are required.

FINISHED SIZE
Length crown-brim: 20 cm
Circumference: stretchy and variable
MATERIALS
less than 1 skein Lion Brand Wool-Ease Chunky (50-75 meters)
1 pair straight or circular needles, size US 11
DIRECTIONS
Cast on 20 stitches using your favorite method. Cast on more for a longer hat, or fewer for a shorter hat. Do not join in the round.
Work in garter stitch (knit every stitch, every row) until the piece is long enough to comfortably wrap all the way around your head, then bind off. A shorter rectangle will be tighter, and a longer rectangle will be looser. Remember that garter stitch is stretchy!
Seam the two short ends of the rectangle together to make a tube. Then, using a yarn needle, thread a piece of yarn through the ridges on the top of the tube, pull very tightly, and knot.
Weave in ends, and wear proudly.

FINISHED SIZE
Length crown-brim: 20 cm
Circumference: stretchy and variable
MATERIALS
less than 1 skein Lion Brand Wool-Ease Chunky (50-75 meters)
1 pair straight or circular needles, size US 11
DIRECTIONS
Cast on 20 stitches using your favorite method. Cast on more for a longer hat, or fewer for a shorter hat. Do not join in the round.
Work in garter stitch (knit every stitch, every row) until the piece is long enough to comfortably wrap all the way around your head, then bind off. A shorter rectangle will be tighter, and a longer rectangle will be looser. Remember that garter stitch is stretchy!
Seam the two short ends of the rectangle together to make a tube. Then, using a yarn needle, thread a piece of yarn through the ridges on the top of the tube, pull very tightly, and knot.
Weave in ends, and wear proudly.
16 December 2010
Cross-stitch chart for book lovers
I drew this up really quickly, based on suggestions from my friends on Ravelry.
Cross-stitch chart, for book lovers.
Please use this! It's free! Though if you do, please leave me a comment (so I can see it!) and credit me.

In case it's not clear, the black border is backstitch, and the filled red blocks are regular cross stitches.
Enjoy!
Cross-stitch chart, for book lovers.
Please use this! It's free! Though if you do, please leave me a comment (so I can see it!) and credit me.

In case it's not clear, the black border is backstitch, and the filled red blocks are regular cross stitches.
Enjoy!
12 October 2010
boooooots
Black mid-calf/knee boots with a small heel (up to 2"). Leather, sturdy, comfy, minimal detailing, round toe. I like a slouch silhouette but it's not critical. Some I like:
Endless: Everything I'm looking for, maybe a little on the plain side.
Endless: Perfect, but not in my size.
Endless: Great, except that reviewers say the calf is narrow and my calves are not.
Fluevogs 1 : not totally keen on the not-black heel and buckles
Fluevogs 2 : not exactly what I have in mind, but utterly fabulous
Endless: I like everything on these EXCEPT the sole seems flimsy, and a heel would be nice.
Endless: I like everything on these except the hardware (there's too much)
Payless : very cute, but a bit shorter than I have in mind
Endless: Everything I'm looking for, maybe a little on the plain side.
Endless: Perfect, but not in my size.
Endless: Great, except that reviewers say the calf is narrow and my calves are not.
Fluevogs 1 : not totally keen on the not-black heel and buckles
Fluevogs 2 : not exactly what I have in mind, but utterly fabulous
Endless: I like everything on these EXCEPT the sole seems flimsy, and a heel would be nice.
Endless: I like everything on these except the hardware (there's too much)
Payless : very cute, but a bit shorter than I have in mind
21 September 2010
Wish List 2010!
glass pie plate
umbrella swift
moar stitch markers (NOT split)
DVD player (the component output on our current one is broken
DVDs:
Back to the Future
Galaxy Quest
apple peeler
spring-loaded potato masher
slide rule
1lb Blue Heeler from Alterra
GORGEOUS RAINBOW YARN
umbrella swift
moar stitch markers (NOT split)
DVD player (the component output on our current one is broken
DVDs:
Back to the Future
Galaxy Quest
apple peeler
spring-loaded potato masher
slide rule
1lb Blue Heeler from Alterra
GORGEOUS RAINBOW YARN
30 August 2010
What do you do with 11 pounds of tomatoes?
SAUCE, that's what.
4 smallish onions, coarsely chopped

A big old bag of dried basil, since I couldn't find fresh.

11 pounds of organic heirloom tomatoes ($10), coarsely chopped


This is what was left after I was done attacking them:
Stems and split parts

A few nasty ones

It all came together into this:

Added a few big glugs of balsamic vinegar, some white wine, and a whole bunch of spices that I thought went with it.
Simmered for h-o-u-r-s, stirring often. After a while I hit it with my stick blender, and let it keep going for a while. Lots of salt and pepper.
MMMMMMdelicious. Most of this is destined for the freezer.
4 smallish onions, coarsely chopped

A big old bag of dried basil, since I couldn't find fresh.

11 pounds of organic heirloom tomatoes ($10), coarsely chopped


This is what was left after I was done attacking them:
Stems and split parts

A few nasty ones

It all came together into this:

Added a few big glugs of balsamic vinegar, some white wine, and a whole bunch of spices that I thought went with it.
Simmered for h-o-u-r-s, stirring often. After a while I hit it with my stick blender, and let it keep going for a while. Lots of salt and pepper.
MMMMMMdelicious. Most of this is destined for the freezer.
23 August 2010
teaching LJ to knit

SAFAS Seminar:
Getting Started with Knitting!
Hello, everyone! Thanks for coming to our seminar today. We hope you will find the tutorials useful and fun!
Love and fiber,
LadyMac111 and Sternel
Outline
I. Introduction and History
II. Materials
III. Basic knitting techniques
IV. Simple garments
A. Scarf
B. Hat
C. Sweater
V. More complex garments
VI. More resources
I. Introduction and History of Knitting (with a focus on Terran traditions)
Knitting is but one of a number of ancient Terran crafts that undergoes periodic revivals as hobbies. Along with crocheting; weaving; spinning; embroidery and needlepoint; quilting; and sewing, knitting has a long history of necessity, hobby, and art for us to take advantage of.
Knitting itself was a late-developing craft, and the earliest surviving examples we have are socks from the Egyptian region, ca 1000 CE. They were knit in fine cotton thread and used multiple colors to create intricate patterns.

From there, via trade and war, knitting spread from the Middle East throughout the European sub-continent, growing in popularity. The fabric created by knitting is flexible and will stretch and return to its shape, making it ideal for garments. It took time for knitting to become a common activity. Initially, it was used to create accessories and finery for the upper classes, such as this example, liturgical gloves from the German region of Europe, dated 1297.

(They are still on view in the Victoria & Albert museum in London, should any cadets finding themselves in England wish to view them in person.)
Over the next several hundred years, knitting spread to lower classes, and people began knitting garments for their own use. Guilds formed, and knitting became both a form of cultural expression and an economic engine. The development of mechanized knitting during the Industrial Age destroyed the livelihood of many cottage knitters, who relied on their handicraft for their income. As a consequence, knitting shifted from a necessity back to an art form during the Victorian Era. Popular publications distributed patterns, helping to formalize written instructions. Now patterns and techniques could be shared on a much wider basis.

By the 20th Century, knitting had become high fashion again, as demonstrated by this famous garment, recognizable to those cadets who follow the era’s fashions:

Knitting has continued to flourish in a variety of traditions, and is frequently employed as a method of preserving and celebrating ethnic traditions. Some examples include the Haapsalu shawls of Estonia:

Fair Isle colorwork from Scotland:

And Andean knitting, a unique example combining indigenous patterns with knitting learned from European invaders:

There are, of course, numerous examples of needle and fiber craft on other Federation planets. The weaving tradition on Andoria has become a popular export, especially when made with Andorian silk. Vulcan naflakh sai-tukh (lit: chained fabric) is a technique similar to nålebinding, a Terran Scandanavian technique that is a precursor to knitting. And we’ve all heard of Risan lace, so I’m sure I don’t need to go into details on that.
Here in San Francisco, the weather is often chilly and damp. It may be warm and sunny this week, but that will change fast! What better way to deal with the weather than with your own hand-knit garments? Let's get started!
II. Materials
Knitting is a craft, and all crafts have supplies. For very basic pieces, like scarves, you will need a pair of knitting needles and some yarn. For more complex pieces, you will need other supplies such as a yarn needle, stitch markers, stitch holders, double-pointed or circular needles, blocking mats and pins, crochet hooks, pompom makers ... the list is long. But for your first project, just yarn and needles will be fine.
A. Choosing yarn for your first project
(Yarn recommendations are based on yarns that are readily available in the United States.)
The yarn you choose depends on your taste. The first thing to consider is the fiber.
Wool

On Earth, wool is one of the most common fibers for yarn. It is sheared from sheep, cleaned, and spun into yarn, before being dyed any imaginable color.
Wool yarn may be soft or scratchy, depending on the breed of sheep it came from and how it was prepared. For example, merino is a breed of sheep that produces very soft wool. Wool is also quite warm, and flame retardant. However, wool can also felt, or shrink and become dense when agitated in hot water. For this reason, woolen garments must be cleaned gently. Some woolen yarns are "superwash", or treated so that they will not felt. You can't always trust a wool labeled "superwash", though, so tread carefully if you go that route.
Some people are allergic to wool. If your hands itch when working with wool, consult Medical. I hear Cadet McCoy is generous with antihistamines.
Patons Classic Wool is a good all-wool yarn that is inexpensive and easy to find at craft stores.
Wool blends
Wool is frequently blended with other fibers, for a variety of reasons. Wool and acrylic yarns have the warmth and softness of wool, with the easy-care properties of acrylic, a synthetic fiber. A common and inexpensive wool/acrylic yarn is Lion Brand Wool-Ease.
Acrylic

Acrylic is a synthetic fiber, made from a polymer. It is inexpensive, easy to care for, and easy to find, but many knitters dislike it because it is often scratchy, and it is also flammable. However, it will still work well in many applications! Since acrylic yarn does not come from animals, it is vegan.
Red Heart yarn is 100% acrylic, very inexpensive, and available at craft stores. My first project was made with Red Heart!
Cotton

Cotton is a natural, plant-derived fiber, and therefore vegan. Cotton is soft, but not as warm as wool. Cotton yarn is not as stretchy as wool yarn, and sometimes causes hand fatigue when knitting. It is easier to care for than wool, but less commonly available. You may have to find a yarn store if you want cotton.
Silk

Silk comes from the pupa of the silk moth, and is not suitable for Vulcans or other vegetarians, since the insect is usually killed in the process.
Silk fibers are very strong and smooth, and silk yarn and fabric is slippery and exceptionally warm. Pure silk yarns are hard to come by, but it is frequently blended with wool to create yarn that is warm, soft, and slightly shimmery.
Knit Picks Gloss is an affordable example that is available over the internet.
Weight
Yarn weight is very important to consider when planning a project. Yarns range from barely-there thread, all the way up to enormous super-bulky. For a first project, worsted or bulky is best, since the stitches will be large enough to see easily, and the piece will come together fast. Avoid super-bulky and novelty yarns (fuzzy, blobby, anything not a long cylinder really), since they can be difficult to work with.

There are hundreds, if not thousands, different yarns. When shopping, fondle the yarn and pick one that has the properties and feel that you like. Also make sure to check the care instructions, and be sure you buy enough for your project.
B. Needles

Now that you have your yarn chosen, you need to get some knitting needles. If you look at the paper band on your yarn, it will probably tell you what size needle is recommended for the yarn. For worsted or bulky yarn, this size is probably 8, 9, 10, or 11 (in US sizes). A metric measurement may also be given; this is the diameter of the needle in millimeters.
Knitting needles are made of many different materials, most commonly wood, plastic, metal, or bamboo. For your first project, it doesn't much matter what you use. As you gain experience you will probably develop preferences. If you are allergic to nickel, you may want to avoid metal needles.
If you can borrow needles for your first project, that would be fine. If your knitter friend has a large selection of needles, you can even try different sizes to find the one that makes a fabric you like. If not, you can buy inexpensive metal, bamboo, or acrylic needles in sets, or just get one pair in the size recommended by your yarn. For the simple projects I'll get to in a minute, you'll just need two straight needles. A circular needle is made of two short, straight tips, connected by a flexible cable. It is a good choice if you will be making something much wider than a straight needle, since it can reduce wrist strain. Of course, it's also used for making tubes, but that's a tutorial for another time.
III. Basic Knitting Techniques
Knitting is, in its simplest form, pulling loops of yarn through other loops of yarn. There are some common techniques that make this pretty easy, once you get the hang of them.
A. Casting on
Casting on (sometimes called binding on) is the first step in any knitted project, in which you make the first row of loops that you will build the rest of the object from. There are many different techniques for casting on. This one, the long-tail cast-on, is common and versatile.
B. The knit stitch
There are two basic stitches in knitting, the knit stitch and the purl stitch (which is really just a backwards knit stitch). The simple projects below only require the knit stitch.
There are two general styles of knitting: English (or "throwing") and Continental (or "picking"). There are others, but these are the most common. The video below shows Continental style, and demonstrates the basic mechanics of making a knit stitch.
A knitted fabric where every stitch is a "knit" stitch is called garter stitch. The videos below show how to do garter stitch in both Continental and English knitting. Try both and see which one you prefer!
C. Binding off
So you've been knitting along, but you think you've done enough. How do you finish? Binding off (sometimes called casting off) takes the live stitches on your needles and secures them so your work won't unravel.
These videos aren't on YouTube, so you'll have to go to the Knitting Help website to see them.
D. Finishing techniques
Mattress stitch is used to sew two pieces of knitted fabric together with a nice, invisible seam. It's not required for finishing seamed projects, but it sure looks nice. You will need a needle with an eye large enough to get your yarn through -- plastic yarn needles are great for worsted and bulky yarn, and they're not very pointy.
Weaving in the ends of the yarn is the last step of any project, unless you are going to block it (see below). Using a yarn needle, follow the path of a strand of yarn in your project, more or less. Take it far enough to pull at least 20 or 30 cm of your yarn tail into the work. Don't simply cut the tail at the knot, because it's very likely to unravel! Leave a little extra length.
Blocking is the last step before modeling your work! Hats and scarves usually don't need it, but sweaters and other fitted garments do. Wash the piece by hand or according to the instructions on the ball band, and lay it out flat to dry. Be sure it's in the shape that you want! You can pin it to something (foam board, carpet, etc) to help it hold the right shape, if you want. Leave it there until it is completely dry, which may take a day or two since it's so damp here in San Francisco. Be patient!
E. A note on Gauge
Gauge is a measurement of how large your stitches are, and is typically measured in stitches and rows per unit length, e.g. 10 stitches and 8 rows per 10 cm. For some projects, like scarves, gauge is largely unimportant. For some, like sweaters, it is vital. For others, only the stitch gauge will matter, and row gauge is unimportant. Every pattern will tell you what gauge to have, but you can change it up if you want to (which is a topic for another time).
Your gauge will be different for every yarn and needle combination, and may even change over time. To measure your gauge, you will need to knit a swatch in the stitch pattern you will be using. It should be at least 10 cm square, and the larger it is, the more accurate your measurement will be. Wash and block the swatch how you will wash and block the finished piece before you measure it.
IV. Simple garments
A. Scarf
One of the most simple knitted projects, and one that is usually a first project, is a garter stitch scarf. Gauge is pretty unimportant here, since it's just a rectangle.
You will need about 150-200 meters of yarn for a typical scarf. More or less will make a longer or shorter scarf.
Cast on as many stitches as you want for the width of the scarf. In a worsted or bulky yarn, 20 is pretty good. Cast on more or less to make the scarf wider or narrower.
Work in garter stitch until the scarf is as long as you want it, then bind off. Remember that garter stitch is stretchy!
Wash and block if desired.
B. Hat
The knitting for this hat is the same as the scarf, but you will need to know how to do a seam, and you will need to measure your stitch gauge. You will need 50-75m of bulky yarn.
Cast on 20 cm of stitches. For the sample, this was 20 stitches in bulky yarn (Lion Brand Wool-Ease Chunky) on US 11 needles. For a longer hat, cast on a few centimeters more.
Work in garter stitch until the piece is long enough to comfortably wrap all the way around your head, then bind off. A shorter rectangle will be tighter, and a longer rectangle will be looser. Remember that garter stitch is stretchy!
Seam the two short ends of the rectangle together to make a tube. Then, using your yarn needle, thread a piece of yarn through the ridges on the top of the tube, pull very tightly, and knot. If you like, you can make a pompom to decorate it, though regulations technically frown on pompoms.
C. Pullover

(I made a very tiny sample -- it's about three inches tall.)
This sweater is simple to knit, if a bit bigger than the hat and scarf, and will keep you warm in the winter. You will need to know how to seam, and you will need to measure your stitch gauge. Different sizes will require different amounts of yarn. For an adult small (36" chest circumference), you will need at least 1000m of worsted weight yarn. For a large (40" chest circumference), you will need at least 1500m. Bulkier yarns will require less, but it is always good to have extra, rather than to run out before you finish!
First, determine the size. One way to do this is to find a shirt that you like the fit of, lay it flat, and measure the maximum width and length of the body and sleeves.

BODY: make two (front and back).
Cast on enough stitches to make up the width you measured. Work in garter stitch until it is the right length when slightly stretched (remember that it will stretch more when you wear it). If you leave very long yarn tails (at least three times the length of the seam), you can use them to sew the pieces together.
SLEEVES: make two.
Cast on enough stitches to make up DOUBLE of the sleeve width you measured. Work in garter stitch until it is the right length when slightly stretched (remember that it will stretch more when you wear it). If you leave very long yarn tails (at least three times the length of the seam), you can use them to sew the pieces together. (My tails were too short.)

Wash and block the pieces to the desired size. Seam the shoulders as shown, leaving 1/3 of the edge open in the middle. Try this on to be sure there is enough room to get it over your head!

Align the center of the sleeve with the shoulder seam, and seam the sleeves to the body.


Seam from the cuff of the sleeve to the armpit, and from the bottom hem to the armpit, on each side. Be careful not to stretch the pieces differently, or they won't line up when you get to the end.

Weave in any ends, and Wash and block again if desired. Rock that sweater, baby!
V. More complex garments
Unlike the projects above, most published patterns will tell you what weight of yarn and what size needles to use, in addition to the row and stitch gauge you should have. If you don't get gauge, you will either need to change yarn/needles until you do, or do some math to compensate. Published patterns will also tell you the amount of yarn you will need, though every knitter is different, so the actual amount will vary. Overestimating is better than underestimating, so buy extra yarn!
Scotty's Hat
Want to look as GQ as this MF?

Thanks to Nicole Lorenz, you can!
This hat is based on garter stitch, but requires a couple of non-beginner techniques - decreasing, short rows, and picking up stitches. The tutorials from KnittingHelp are helpfully provided in the pattern, and there is a link to a slightly different version, that requires purling but is made all in one piece.
City on the Edge of Forever beanie

There are hundreds, maybe even thousands, of patterns for simple hats like this. Sure, you could buy one, but the ones in the store come with my favorite part already done.
Abby Tohline has a free pattern on her blog, but a little Googling will reveal many, many more. You will need to know how to purl, decrease, and knit in the round (which is not scary at all, don't let anyone tell you it is!)
Wesley Crusher's Awesome Sweaters

I refuse (on moral grounds) to even look for a pattern for that. But The Anticraft has a free pattern for a basic raglan sweater that should fit a bit better than the garter stitch one I gave you above.
VI. More resources
In my opinion, the very best resource for a beginning knitter is a patient experienced knitter. A lot of yarn and craft stores offer knitting classes, if you want to go that route. Failing that, the tutorials at KnittingHelp.com (which we used above) will give you an introduction to pretty much any technique you can think of.
If you want to get serious about yarn (or even just a little serious, you know, not exclusive or anything), Ravelry is waiting for you! Their pattern database was recently updated to be even easier to use, and contains (as of this writing) 173,777 knitting and crochet patterns, 53,254 of which are FREE! They also have a yarn database, forums, and your own online notebook to keep track of all your projects, your yarn stash, your needles, your friends (we're ladymac111 and abbieprime), your favorites, and your list of things you want to make in the future. Be careful, though, you might get addicted.
Well, it looks like that's what we have for you today! And don't worry, the weather is forecast to cool down on Friday. Then you can surround yourself with yarn!
Questions and comments are welcome!
LadyMac111 and Sternel
22 June 2010
Cooking Adventures: Pesto Pasta with Beans
This is part of clearing out the food that we still have. Also, it's a tasty vegan meal! And easier than pie.
Step one: the beans. I have here 1/3 cup each of dried pinto, small red, and kidney beans. Sort to remove rocks, rinse well, cover with a few inches of water, bring to a boil, turn off the heat, and then let sit covered for an hour.

Cover with fresh cold water, and simmer for an hour. Drain.
While the beans are simmering, cook the pasta according to the package directions (I have fettucine, but something like rotini or medium/large shells would be better).
Drain the pasta. Combine beans and pasta and toss with one jar of pesto.
Serve hot, with parm if you want (but we don't have any). Delicious!
Step one: the beans. I have here 1/3 cup each of dried pinto, small red, and kidney beans. Sort to remove rocks, rinse well, cover with a few inches of water, bring to a boil, turn off the heat, and then let sit covered for an hour.

Cover with fresh cold water, and simmer for an hour. Drain.
While the beans are simmering, cook the pasta according to the package directions (I have fettucine, but something like rotini or medium/large shells would be better).
Drain the pasta. Combine beans and pasta and toss with one jar of pesto.
Serve hot, with parm if you want (but we don't have any). Delicious!
21 June 2010
Moving is hard pt. 1: food
What we have:
Monday: dinner: mashed potatoes, carrots, blueberries, apple pie
Tuesday: breakfast: waffles, blueberries
lunch:
dinner: pasta, beans, pesto
Wednesday: breakfast: cereal
lunch: peanut butter sandwiches
dinner: Tuesday leftovers
Thursday: breakfast:
lunch: Sai Ram or India Dabar
Dinner: Tuesday leftovers
Friday: breakfast:
lunch: peanut butter sandwiches
dinner: Zatarain's with fried tofu
Saturday: brunch:
dinner: tailgate party
Sunday: breakfast:
lunch:
dinner: pizza with friends, lots of liquor, give away some stuff
Monday: breakfast: dry cereal
lunch: pb
dinner: on road
- pasta
- pesto
- beans
- tofu
- Zat rice and a can of tomatoes
- a chicken breast
- apple pie
- granola bars (good for travel)
- craisins (travel)
- sunflower seeds (travel)
- cereal
- pancake mix
- syrup
- chicken stock
- carrots
- blueberries
- liquor
- cooking oils
- balsamic vinegar
Monday: dinner: mashed potatoes, carrots, blueberries, apple pie
Tuesday: breakfast: waffles, blueberries
lunch:
dinner: pasta, beans, pesto
Wednesday: breakfast: cereal
lunch: peanut butter sandwiches
dinner: Tuesday leftovers
Thursday: breakfast:
lunch: Sai Ram or India Dabar
Dinner: Tuesday leftovers
Friday: breakfast:
lunch: peanut butter sandwiches
dinner: Zatarain's with fried tofu
Saturday: brunch:
dinner: tailgate party
Sunday: breakfast:
lunch:
dinner: pizza with friends, lots of liquor, give away some stuff
Monday: breakfast: dry cereal
lunch: pb
dinner: on road
11 October 2009
My holiday wishlist
Oh gosh, every year it gets harder to make one of these. Updates as necessary.
- Dollhouse season 1 on DVD
- House season 5 on DVD
- KnitPicks gift card
- yarn in general
- Suede-soled jazz shoes (like this one) -- sizing on them is always funny, and the dance store in Appleton has them in stock in every size.
- New Star Trek movie on DVD
- Wall-E on DVD
- Wool for spinning
- the Bliese spinning wheel!
- a lighted makeup mirror
- new slippers! I have literally worn mine to pieces
05 October 2009
And so it begins...
I had my first wedding nightmare last night, probably because I spent a lot of yesterday reading books I got from the APL about how to make a ceremony.
So in the dream we got married but Erik forgot to bring the rings along. No big, we just skipped that part. So later we were together and we got them out and put them on -- and they were ALL WRONG. His was something enormous and fancy, and mine was made of acrylic (clear plastic, not yarn!), carved with swirly designs, and had a giant opal in a prong setting (the prongs were acrylic too). I got really angry that he ordered something totally different from what we wanted, but he apparently liked them and didn't care what I thought. So I grabbed his and took mine off and threw them both on the floor (and they proceeded to bounce away) and I stalked off angrily in my wedding dress.
Anyway, it's quite some time before I have any good reason to worry about the rings being wrong/forgotten, since we don't even have the year chosen yet. BUT that doesn't mean we don't have ideas!
This is my engagement ring (in "Happy Feet" by Plymouth Yarns):

And these are some bands we like (from e-weddingbands.com)
For me:

For him:

Totally different than in the dream! So maybe you can see why I was so angry -- we're going for simple and classy.
Knitting!
Second alpaca sock is coming along well -- did a couple of inches already today. I need to find the first one so I can carry it around to measure the second so I know when to start the heel.
So in the dream we got married but Erik forgot to bring the rings along. No big, we just skipped that part. So later we were together and we got them out and put them on -- and they were ALL WRONG. His was something enormous and fancy, and mine was made of acrylic (clear plastic, not yarn!), carved with swirly designs, and had a giant opal in a prong setting (the prongs were acrylic too). I got really angry that he ordered something totally different from what we wanted, but he apparently liked them and didn't care what I thought. So I grabbed his and took mine off and threw them both on the floor (and they proceeded to bounce away) and I stalked off angrily in my wedding dress.
Anyway, it's quite some time before I have any good reason to worry about the rings being wrong/forgotten, since we don't even have the year chosen yet. BUT that doesn't mean we don't have ideas!
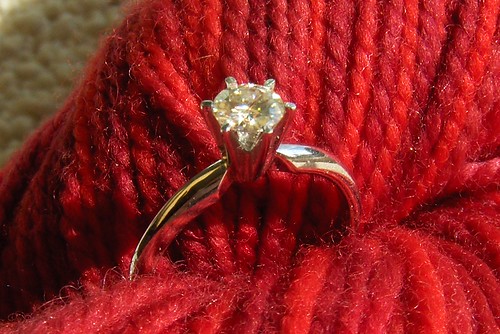
This is my engagement ring (in "Happy Feet" by Plymouth Yarns):
And these are some bands we like (from e-weddingbands.com)
For me:

For him:

Totally different than in the dream! So maybe you can see why I was so angry -- we're going for simple and classy.
Knitting!
Second alpaca sock is coming along well -- did a couple of inches already today. I need to find the first one so I can carry it around to measure the second so I know when to start the heel.
Subscribe to:
Posts (Atom)